In the world of PC gaming and content creation, few things are as disheartening as watching a once-mighty graphics card begin to falter. The fans spin louder, the frame rates dip, and the chassis feels unusually warm. For many veteran gamers in 2026, this is a familiar tale, often signaling a simple but critical maintenance need: the thermal paste between the GPU die and its cooler has dried out and lost its efficacy. This microscopic layer is the unsung hero of thermal management, filling the minuscule imperfections between two metal surfaces to facilitate optimal heat transfer. Over years of intense gaming sessions and rendering workloads, this paste can shrink and crack, leading to inefficient cooling, thermal throttling, and a noticeable decline in performance. While the process of replacing it might seem daunting, it's a manageable task that can breathe new life into an aging card, restoring its vigor and potentially extending its lifespan by several more years.

🛠️ Preparation is Key: Gathering Your Arsenal
Before embarking on this technical journey, assembling the right tools is paramount. Rushing in unprepared is the quickest path to frustration or, worse, damage. Here's your essential checklist:
-
High-Quality Thermal Paste: The star of the show. Opt for a reputable, non-conductive paste.
-
Screwdriver Set: Must include Phillips heads and, crucially, Torx heads, as many modern and older graphics cards use these security screws.
-
Replacement Thermal Pads: These are often overlooked but vital for cooling memory chips and VRMs. Having spares is wise.
-
Plastic Pry Tool: For gently separating components without scratching PCBs.
-
99% Isopropyl Alcohol & Cotton Balls/Swabs: For dissolving and cleaning off the old, crusty thermal paste.
-
Canned Air Duster or Blower Bulb: For evicting dust bunnies from heatsink fins.
-
Anti-Static Wrist Strap & Mat (Optional but Recommended): Provides peace of mind against electrostatic discharge.
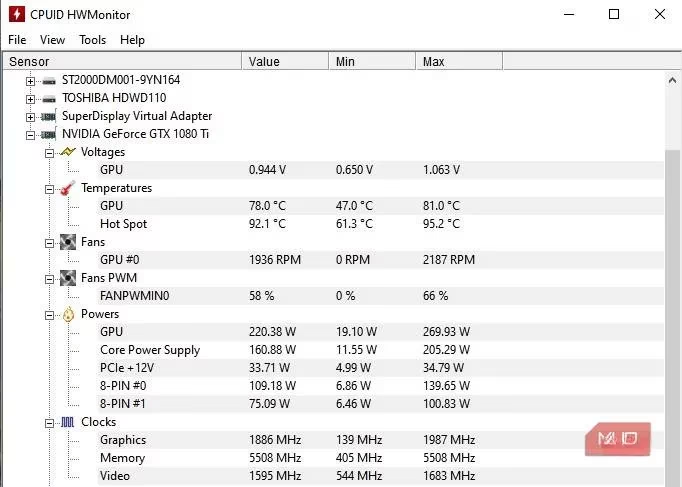
📊 Step 0: The Critical Benchmark – Know Your Baseline
Never skip this step. The goal is to have concrete data, not guesswork. First, download a hardware monitoring tool like HWiNFO and a demanding benchmark like Unigine Heaven or Superposition. Run the benchmark for a solid 10-15 minutes to push the GPU to its maximum sustained load. Observe the peak GPU temperature. While manufacturers often set throttle limits around 83-85°C, for a healthy, well-cooled card, you should ideally aim for temperatures in the mid-70s (°C). If your card is consistently hitting 80°C or above, it's a strong indicator that thermal paste renewal should be on your agenda. Before proceeding, however, consider other solutions like undervolting or optimizing case airflow.
🔧 The Disassembly Process: Patience and Precision
-
Safe Removal: Power down your PC completely, switch off and unplug the PSU, and hold the power button to drain residual current. Open your case and carefully unplug the GPU power cables.
-
Release and Remove: Press the PCIe slot latch on your motherboard and gently but firmly pull the graphics card straight out.
-
Opening the Shroud: This is where cards vary widely. Lay the card on an anti-static mat. Using the appropriate screwdrivers, methodically remove all screws from the backplate and cooler. Take photos at each stage to aid reassembly. Remember, some screws may be under warranty void stickers, which could impact support from the manufacturer.
-
Mind the Thermal Pads: As you separate the cooler from the mainboard, do so gently and evenly. Thermal pads on memory chips can be sticky. A plastic pry tool can help. If they remain intact on the components, you can often reuse them. If they tear or look dry, replace them with your new pads cut to size.
🧼 The Deep Clean: Removing the Old Thermal Interface Material
With the GPU die and cooler base exposed, the cleaning ritual begins. This step requires a delicate touch.
-
On the GPU Die: This is the most sensitive part. Never use metal scrapers. Apply a generous amount of 99% isopropyl alcohol to the old thermal paste and let it soak for 30 seconds to loosen it. Gently wipe it away with a lint-free cotton ball or swab, using minimal pressure. Don't worry about non-conductive paste spillover on the substrate; just ensure the silvery surface of the die itself is spotless.
-
On the Cooler: Perform the same soaking and wiping process on the cooler's cold plate until it shines. A clean, flat surface is crucial for optimal contact.
✨ The Art of Application: Applying New Thermal Paste
The golden rule for GPUs is: more is better than less, but don't create a mess. Unlike a CPU with a protective Integrated Heat Spreader (IHS), the GPU cooler sits directly on the bare silicon die. Inadequate coverage is a recipe for hotspots.
-
Apply a generous pea-sized dot (or a thick X pattern) of thermal paste directly onto the center of the GPU die. The amount should be noticeably more than you'd use for a CPU.
-
The Crucial Spread: Using a plastic applicator, a gloved finger, or even a clean credit card edge, gently spread the paste to ensure it uniformly covers the entire surface of the die, reaching all the way to the edges. The layer should be thick enough that you cannot see the silicon through it, but not so thick that it will squeeze out excessively.
🔩 Reassembly and The Moment of Truth
-
Carefully lower the cooler back onto the mainboard, aligning the screw holes. If you replaced thermal pads, ensure they are correctly positioned.
-
Begin screwing in the spring-loaded screws around the GPU in a criss-cross pattern, tightening each a little at a time to ensure even pressure distribution.
-
Reattach all power connectors for the fans and RGB, secure the IO bracket, and fasten the backplate.
-
Reinstall the card into your PC, connect the power cables, and close up the case.
✅ Final Validation: Testing Your Work
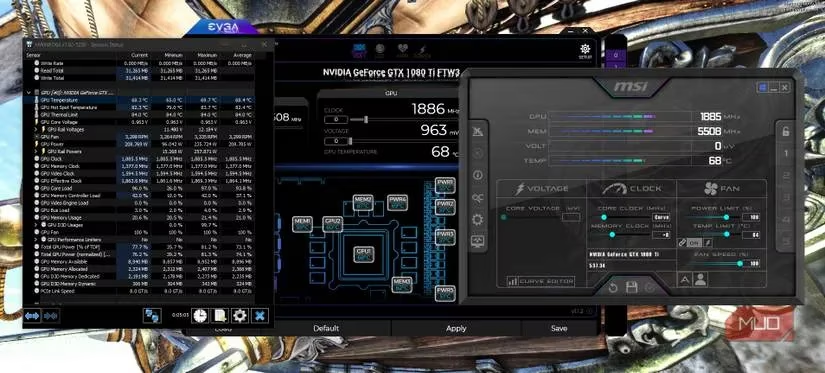
The job isn't done until you've verified the results. Repeat the exact same benchmark and monitoring procedure from Step 0. Let it run for at least 10-15 minutes. A successful repaste should yield a significant temperature drop—anywhere from 5°C to 15°C or more is common. Monitor not just the GPU core, but also memory junction temperatures if your monitoring software supports it.
In one documented case, a veteran GeForce GTX 1080 Ti, after repasting, saw its peak temperatures drop from a worrisome 78°C under load to a much healthier average of 75.7°C at a higher voltage. With an aggressive fan curve, it even stabilized below 70°C, a testament to the restored thermal efficiency. This simple maintenance task is profoundly impactful. It combats thermal throttling, reclaims lost clock speeds and FPS, and reduces acoustic noise from overworked fans. For gamers holding onto cherished hardware or those navigating the used market in 2026, mastering this skill is a rite of passage. It's not just about fixing a component; it's about preserving a piece of gaming history and ensuring many more years of high-fidelity adventures. 🎮✨