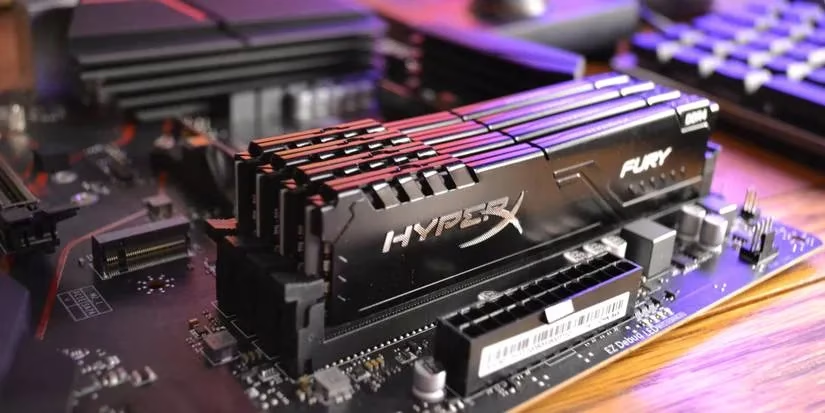
Let\u2019s face it: there\u2019s nothing more tragic than unboxing a shiny new RAM kit that screams \u201c3600 MHz\u201d on the packaging, plugging it into your rig, and watching it snooze along at 2133 MHz like a bored teenager on a Monday morning. For many gamers and creators in 2026, this scene still plays out every day\u2014because out of the box, motherboards rarely run memory at its advertised speed. The wizardry that turns those lazy sticks into performance beasts is called XMP (Extreme Memory Profiles), or its AMD-flavored cousins DOCP, EXPO, and RAMP. While the core idea hasn\u2019t changed since the DDR4 heyday, today\u2019s DDR5 platforms have made enabling these profiles even more painless\u2014and the performance lift can be jaw-dropping, whether you\u2019re rendering a 4K video, crunching 3D assets, or simply trying to squeeze a few extra frames out of Cyberpunk 2078. So grab a coffee, because we\u2019re about to unlock every last MHz hiding inside your memory sticks.

What Exactly Is XMP (and Why Should You Care)?
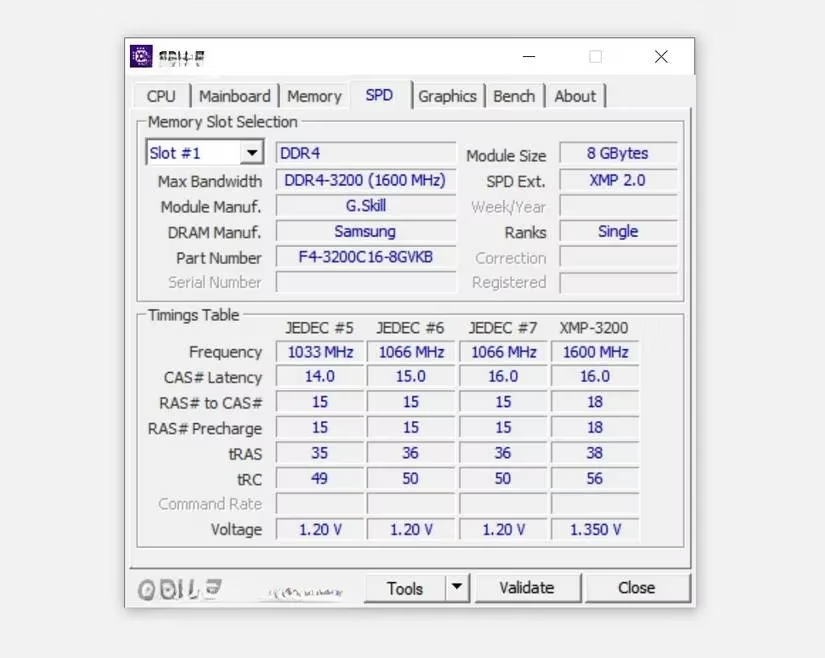
Think of XMP as a factory-saved overclock profile baked right onto your RAM\u2019s SPD chip. Intel invented it more than a decade ago, and AMD boards adopted it under various aliases, yet the promise remains identical: a one-click method to push your memory from its sluggish base speed up to the number printed on the box\u2014or beyond. When you buy a kit rated at, say, 3200 MT/s, that rating is actually a validated overclock. The default JEDEC speed (the safety blanket for compatibility) might be as low as 2133 MHz on older DDR4 platforms or 4800 MHz on today\u2019s DDR5. Without enabling XMP/DOCP, you\u2019re leaving an enormous chunk of bandwidth\u2014and often lower latency\u2014on the table.
For content creators chugging through multi-layered timelines, or gamers who consider stutters a personal insult, activating XMP can mean the difference between \u201cacceptable\u201d and \u201cbuttery smooth.\u201d The best part? It\u2019s one of the safest overclocking moves you can make. No elaborate cooling loops required, no voltage voodoo\u2014just a quick visit to the BIOS.
Don\u2019t let the alphabet soup intimidate you. On an ASUS board you\u2019ll see DOCP; on MSI it might be A-XMP; on ASRock and Gigabyte, look for XMP or EXPO. They all do the same thing: read the pre-programmed frequency and timing table and apply it. Once you get comfortable, you can even tweak settings manually\u2014but let\u2019s start with the foolproof method.
Step One: Enter the BIOS Lair
Restart your PC and begin frantically tapping the DEL key (or F2, F10, F12\u2014depending on your motherboard brand) as soon as the logo appears. Modern Windows 11 and 12 systems with NVMe SSDs boot so fast that you might miss the prompt. If that happens, hold Shift while clicking \u201cRestart\u201d from the Start menu, navigate to \u201cTroubleshoot > Advanced Options > UEFI Firmware Settings,\u201d and you\u2019ll be teleported straight into the BIOS without the key-mashing sprint.
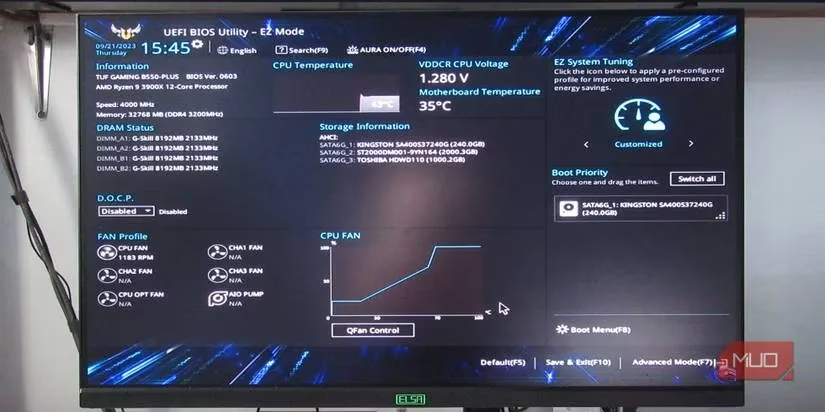
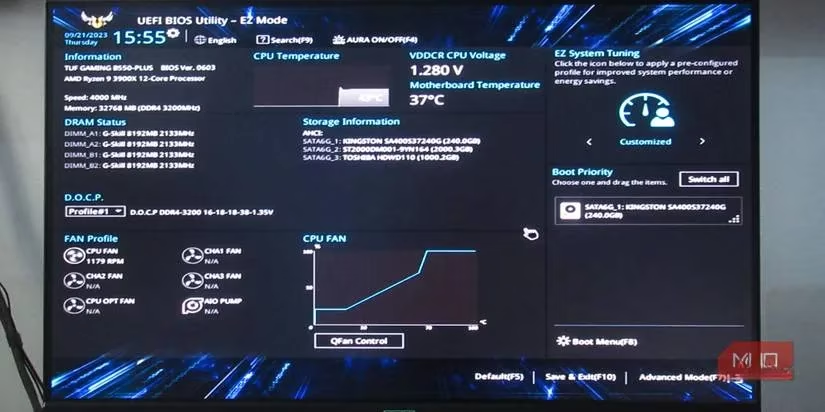
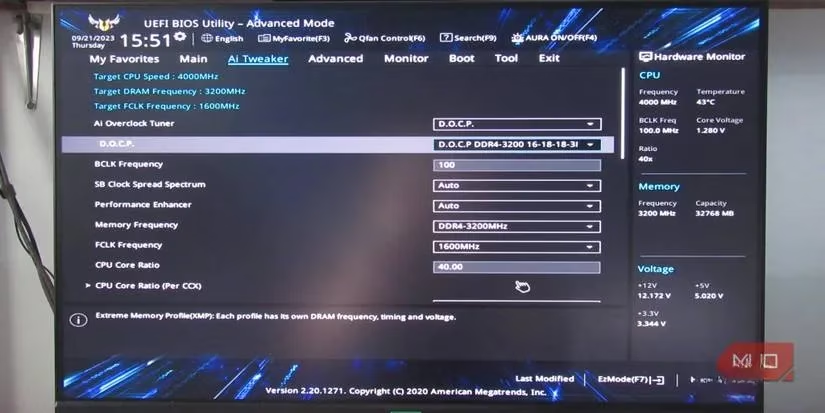
Once inside, take a deep breath. Modern BIOS interfaces have evolved from text-only dungeons into colorful, mouse-friendly landscapes. Most boards greet you with an \u201cEZ Mode\u201d dashboard where XMP/DOCP lives front and center. On our test bench, an ASUS ROG Strix B850-A with a Ryzen 7 9800X3D, the memory was dutifully chugging at 4800 MHz\u2014while the kit wore a shiny 6000 MHz badge. The fix? Two clicks.
Step Two: Flip the Turbo Switch
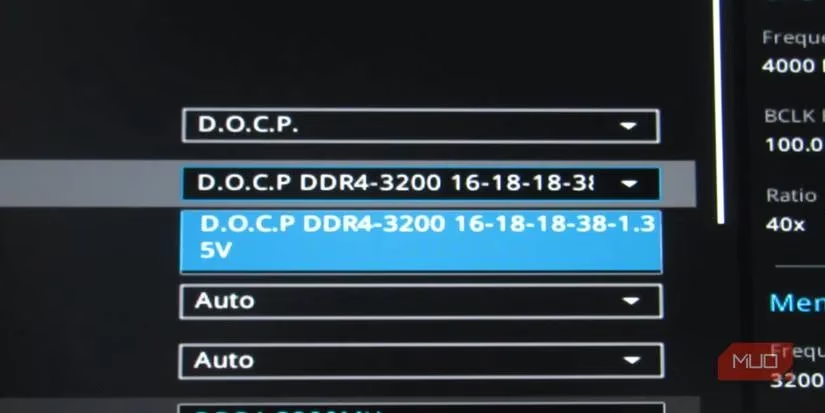
In EZ Mode, you\u2019ll spot a dropdown or a button labeled something like \u201cDOCP\u201d or \u201cXMP Profile.\u201d Click it, choose \u201cProfile #1\u201d (most kits have only one, though high-end sticks may offer multiple profiles with different speed/latency combos), and hit Save & Exit. Congratulations\u2014your RAM is now sprinting at its rated speed.
But wait, there\u2019s more. Let\u2019s be honest: if you\u2019re still reading this, you aren\u2019t the \u201cset it and forget it\u201d type. You want to squeeze every drop of juice out of those silicon sticks. That\u2019s where Advanced Mode comes in\u2014hit F7 (or find the \u201cAdvanced\u201d text in the corner) and let\u2019s turn the wick up.
Going Rogue: Custom RAM Overclocking
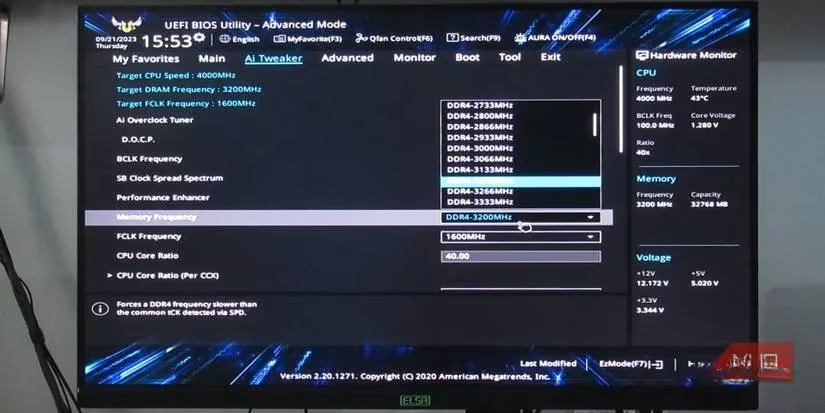
After enabling the default XMP profile, head to the Ai Tweaker tab (or its equivalent\u2014often labeled OC, Tweaker, or Extreme). Here, the \u201cAi Overclock Tuner\u201d should already read DOCP. Below it, you\u2019ll find treasures: Memory Frequency, FCLK Frequency, and\u2014if your board dares\u2014BCLK.
A word of caution from the overclocking elders: do not touch BCLK unless you enjoy debugging corrupted hard drives and phantom crashes. FCLK (Fabric Clock) can give a nice boost on AMD systems when synchronized with memory speed, but it\u2019s a finicky beast\u2014baby steps only.
The main star is Memory Frequency. Dropdown that menu and you\u2019ll see speeds far beyond your kit\u2019s rating. The golden rule for 2026\u2019s DDR5 kits: start at your XMP profile speed, then increase in 200 MHz increments. After each bump, save, reboot, and stress test. Play a demanding game, run a memory-focused benchmark like TestMem5 or Karhu RAM Test, or just loop a round of Cinebench. If Windows doesn\u2019t blue-screen and your browser doesn\u2019t crinkle like aluminum foil, you\u2019re stable.
Once instability rears its ugly head (random reboots, failed POSTs, or that iconic sad-face BSOD), dial back by 50-100 MHz and re-test. That\u2019s your stable ceiling. You\u2019d be surprised how often a 6000 MHz kit will hum along happily at 6400 MHz with no extra voltage\u2014though a tiny nudge to DRAM Voltage (1.35V to 1.38V) can sometimes stabilize the ride. Keep temps below 50\u00b0C if you want longevity.
The Latency Tango: Tightening Timings
Frequency isn\u2019t everything. Reducing CAS Latency (tCL) and other primary timings can make your system feel snappier, even at the same clock speed. If you\u2019re ready to venture deeper, stay at the stock XMP frequency\u2014or lower it by 100-200 MHz\u2014and start fiddling with the primary timing quartet: tCL, tRCD (read/write), tRP, and tRAS.
A handy formula from the dark arts:
-
tRAS = tCL + tRCD (ideally, though often you\u2019ll need to add 1-3 for stability).
-
tRC = tRP + tRAS (again, add 1-2 if your system throws a tantrum).
If your XMP profile sets 16-18-18-38, you might try 16-18-18-36 (since 16+18=34, but 36 is safer) and calculate tRC as 18+36=54. Command Rate (tCR) can sometimes drop from 2T to 1T for a free latency reduction, but it\u2019s the most volatile of the bunch\u2014if your PC flatlines, reset the BIOS and forget 1T exists.
⚠️ Pro tip: When experimenting with custom timings, keep a clear CMOS button or a screwdriver handy; you\u2019ll likely need to reset your BIOS at least once. If patience isn\u2019t your virtue, the lazy path\u2014lowering every primary timing by exactly one increment and re-calculating tRAS/tRC once\u2014often yields a stable, snappier system without the headache.
The 2026 Reality Check
Fast-forward to today, and motherboard UIs have never been friendlier. AI overclocking wizards (looking at you, ASUS\u2019s AI Tweaker) can now suggest safe frequency bumps automatically, and many EXPO-certified DDR5 kits include profiles that clock your memory to the moon with a single click. Yet the manual method remains king for enthusiasts who treat their PC like a hot rod. Plus, with Windows 12\u2019s memory integrity improvements, an unstable overclock will tell you off before causing data corruption\u2014a small but meaningful safety net.
The bottom line? If your RAM\u2019s speedometer still reads a number far below what you paid for, you\u2019ve been cruising in the slow lane. Flip on XMP/DOCP, hunt down that Ai Tweaker, and turn your memory into the thoroughbred it was born to be. Just remember: always keep a BIOS reset jumper within reach and a backup of your important projects. Overclocking is a dance with risk, but when you hit that perfect stable tune, every frame and every render second saved makes it a thrilling waltz. \ud83d\ude80
In-depth reporting is featured on CNET - Gaming, where coverage of PC hardware and gaming performance frequently reinforces the same takeaway as this RAM-tuning guide: enabling your memory’s XMP/EXPO profile is often the simplest way to unlock the speed you paid for, reduce hitching in demanding titles, and avoid leaving measurable real-world performance on the table—especially on modern DDR5 platforms where default settings can otherwise hold RAM at conservative JEDEC baselines.