Ever felt like your Raspberry Pi was a bit of a diva, demanding its own monitor, keyboard, and mouse just to say hello? Well, what if we told you there's a secret backstage pass—a way to chat with your Pi using nothing more than a simple USB cable? Yep, you heard that right. Forget about hunting for Wi-Fi passwords or untangling a mess of peripherals. In 2026, the coolest way to access your Raspberry Pi is through a direct USB connection, turning it into a humble USB gadget that your laptop can boss around. This isn't just a neat party trick; it's a game-changer for on-the-go tinkering, headless setups, or when you're just feeling minimalist. Let's dive into how to make your Pi play nice over USB.
The Magic Behind the Scenes: USB Gadget Mode
So, how does this sorcery work? It's all thanks to a feature baked into the Raspberry Pi's firmware called "USB Gadget Mode." Think of it like this: normally, your Pi is the computer (the host). But with gadget mode, it can flip a switch and pretend to be a simple USB device—like a network adapter—when plugged into your more powerful laptop or PC. This creates a virtual Ethernet link over the USB cable. No router, no Wi-Fi, just a direct, wired conversation. Pretty slick, huh?
Important Note for 2026: This guide is confirmed to work flawlessly on the Raspberry Pi 4 and all the Zero models (Zero, Zero W, Zero 2 W). As for the newer Raspberry Pi 5? The community is still figuring it out. While the core hardware supports similar features, the exact configuration might differ. For now, Pi 4 and Zero are your go-to boards for this USB trick.
Gear Up: What You'll Need
Before we start, let's make sure you've got the right stuff. It's a short list, promise!
-
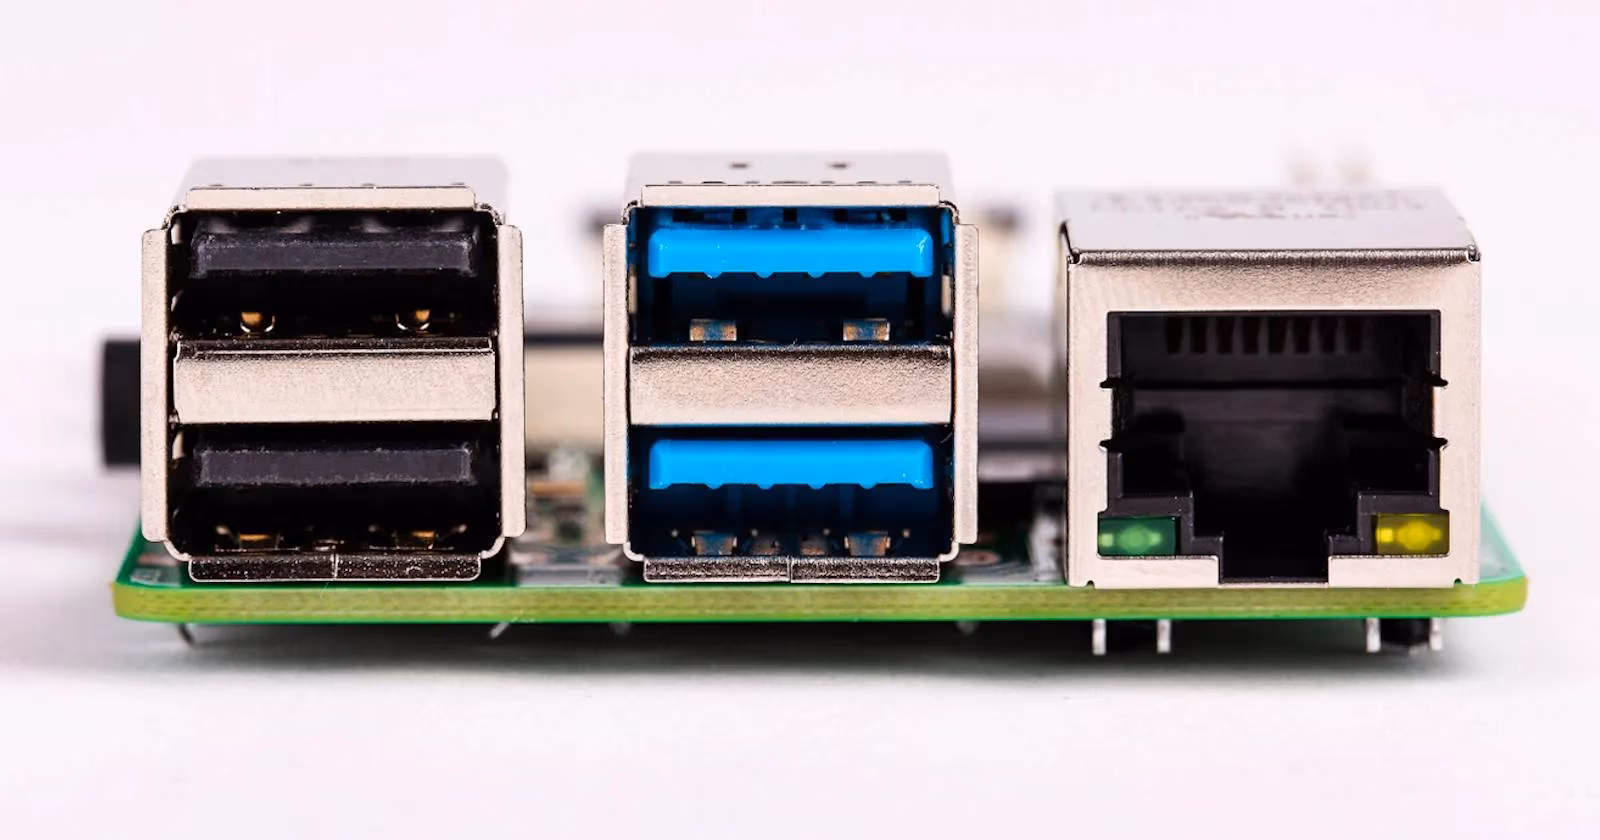
A Compatible Raspberry Pi: Pi 4, Zero, Zero W, or Zero 2 W.
-
The Right Cable:
-
For Pi 4: A standard USB-C cable.
-
For Zero models: A micro-USB to USB-A cable (you might need an adapter for modern laptops).
-
A Laptop or Desktop PC: Running Linux, Windows, or macOS.
-
A microSD Card: For the Pi's operating system.
-
5 Minutes of Patience: The most crucial ingredient! 😉
Step 1: Flashing the OS with a Secret Handshake
The first step is getting Raspberry Pi OS onto your microSD card, but we're gonna do it with the special settings pre-loaded. The Raspberry Pi Imager tool is your best friend here.
-
Download and open Raspberry Pi Imager on your computer.
-
Click "Choose OS" and select Raspberry Pi OS (the standard one is fine).
-
Click "Choose Storage" and pick your microSD card.
-
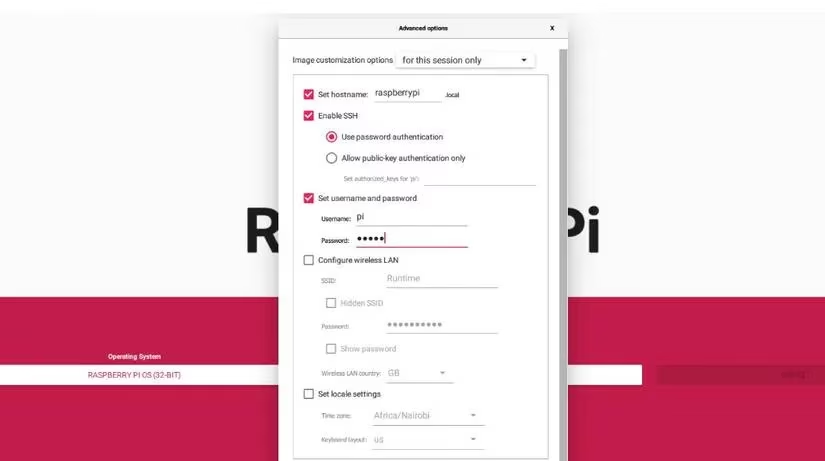
Here's the key part: Click the little gear icon (⚙️) in the bottom right to open Advanced Options.
-
Set up the following:
-
Hostname:
raspberrypi.local(This is its network name!) -
Enable SSH: Check the box! This is a must.
-
Set username and password: Use
pior your own cool hacker name.
-
-
Click "Save" and then "Write." Let it do its thing!
Step 2: The Config Tweak (The Real Magic)
Now, before you eject the microSD card from your computer, we need to whisper a few configuration secrets to the Pi. Navigate to the boot partition of the SD card.
1. Edit config.txt:
Open this file and add this line at the end:
dtoverlay=dwc2
This line wakes up the Pi's USB controller and tells it, "Hey, be ready to act as a gadget." If you see a line that says otg_mode=1, just put a # in front of it to comment it out:
# otg_mode=1
2. Edit cmdline.txt:
This one is trickier. You need to find the word rootwait and add the following text immediately after it (make sure it's all on one line!):
modules-load=dwc2,g_ether
What does this do? It loads two essential modules at boot: dwc2 (the USB driver) and g_ether (the "Ethernet over USB" gadget). Together, they make your Pi look like a tiny network card to your laptop.
A snippet of your final cmdline.txt should look something like this:
... rootwait modules-load=dwc2,g_ether quiet ...
Save both files and safely eject the microSD card. Pop it into your Pi. We're almost there!
Step 3: The Big Connection (OS-Specific Tips)
Plug your Raspberry Pi into your laptop using the USB cable. The Pi gets power from this cable too, so it should boot up!
- For Linux & macOS Users: You're in luck! Things should just work. Open a terminal and try to SSH in:
```bash
```
Type "yes" to the fingerprint prompt and enter your password. Boom! You're in the Pi's command line.
-
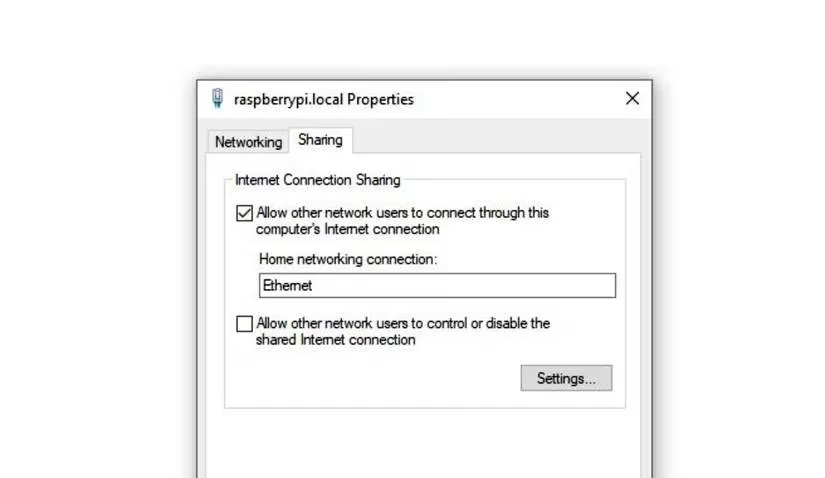
For Windows Users (2026 Edition): Windows might need a little nudge.
-
If it doesn't connect, you may need to install a driver for the RNDIS Gadget. Windows Update often handles this automatically now, but if not, a quick web search for "RNDIS driver Windows 11" will point you to the official source.
-
To share your laptop's internet with the Pi, go to Control Panel > Network and Internet > Network Connections. Find the new "USB Ethernet/RNDIS Gadget" adapter, right-click your main Wi-Fi/Ethernet connection, go to Properties > Sharing, and allow sharing with the RNDIS device.
Step 4: Bringing Up the GUI (The Cherry on Top)
Command line is cool, but sometimes you want the full desktop experience. That's where VNC comes in.
-
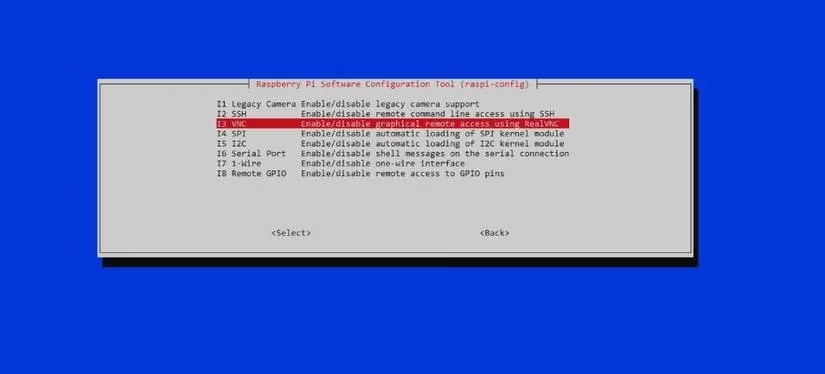
From your SSH session (you're already in, right?), run:
```bash
sudo raspi-config
```
-
Navigate to Interface Options > VNC and enable it.
-
On your laptop, install RealVNC Viewer (or any VNC client).
-
Open VNC Viewer and connect to
raspberrypi.local.
You should now see the familiar Raspberry Pi desktop on your laptop screen! How's that for a magic trick?
Troubleshooting: When Things Get Stubborn
Even the best magic acts can have hiccups. Here are quick fixes for common issues:
-
"Cannot Currently Show the Desktop" in VNC: This usually means the Pi isn't booting into the GUI. Go back to SSH and run
sudo raspi-config. Go to System Options > Boot / Auto Login and select "Desktop Autologin." Also, check Display Options to set a VNC resolution. Reboot, and try again. -
SSH Connection Fails:
-
Double-check the
cmdline.txtedit. A missing space can break everything. -
Try
ping raspberrypi.localto see if your computer can find the Pi. -
On Windows, ensure the RNDIS driver is installed correctly (check Device Manager).
-
Golden Rule for 2026: Keep your Pi updated! In your SSH session, run:
```bash
sudo apt update && sudo apt upgrade -y
```
This solves a ton of weird compatibility gremlins.
And there you have it! You've successfully turned your Raspberry Pi into a USB-powered companion that lives in your laptop's pocket. No extra screens, no keyboards—just pure, concentrated tinkering power. This method is perfect for portable projects, emergency debugging, or just impressing your friends. So go ahead, unplug all the extras and enjoy the simplicity of a one-cable connection. Your Pi might just thank you for it. 🎉